Tuesday, April 26, 2011

A twist on the Rehearsal Bouquet

Most wedding rehearsal ribbon bouquets look a lot like this.


For Stacey's I decided to put a twist on it and use the actual ribbons to make rosettes.
 So it came out looking like this...


Now the bride can pop them off the plate and glue them to a picture frame or a wreath.

Its was really easy to do.  She had oodles of wired ribbon so I pulled on the wiring on one side, gathered the ribbon and rolled it using hot glue to keep it all together.

Easy Peasy!

Traced Font Signage

Here is a little teaser to one of the Projects I have been working on.

This is a grouping of Signs for Stacey's Wedding.  They were lots of fun to do and I took a much more formal approach to painting them which demanded lots of patience!

They are not necessarily difficult to do yourself  But they take a supper steady hand and lots of time.  This one I definitely could not do in front of the TV.  It required my full attention!!

I printed out the words onto paper in the fonts we wanted.
I used Chevalier Becker Street and Engravers MT.

I traced them onto graphite paper over the sign bases.  This is the first time I have ever used graphite paper and it was soooo easy!  I had considered using my Silhouette to make stencils but I thought in this case this was easier.

This is a snippet from the wedding invite which was the inspiration for the Chevalier font.


After tracing with the graphite paper it looks a little messy but this is where that steady hand and a good paintbrush come in.  I used a small flat angled brush to do all of the lettering.


Looks pretty good!


This is a little free hand arrow I did. 


The end!  I cannot wait to show you the end results.  Better than I thought, truth be told!  You'll have to wait till after the wedding this weekend to see how everything turned out:)

Monday, April 25, 2011

The shameless nitty gritty of body waxing

Today I am going to share a with you a type of craft that is a bit different from the norm here!  It can be a DIY, or a tutorial, a guide and a shared experience.  Today I am going to share with you the art of waxing.

There are many women who get waxed, even more that are curious about it but most do not talk about it.  Today I am going to get into the shameless nitty gritty of body waxing.  I have been there and done that and there is not a hair on my body that has not seen wax.  Not a one (you might say, “Well I bet you haven’t waxed your entire eyebrow!” and I will respond with “Oh shit yes I have girlfriend”… but it wasn’t on purpose!)

If you know me, you know I have a head full of voluminous black curly hair.  People are constantly telling how envious they are of my thick rich hair.  Girl please, it’s not just on the top of my head.  I am neurotic about maintaining my body hair.  Yes it’s a full fledged complex that was fueled by years of teasing as a child and embarrassing and painful razor bumps and ingrown hairs. 

I pride myself as being the first girl in the 5th grade to shave her legs.  It was an emergency.  Those were the days that I used to pray to God every night for 1 thing, to shave my legs.  The day came in early spring.  I was sitting in church next to my mom and I was wearing white tights.  My mom glanced over at my legs, the light from the stained glass widow was shining.  It was shining right onto all my black hairs poking through my tights.  Yes, you can gasp or laugh.  It’s totally gross!  She leaned over an whispered in my ear, “Tonight you are shaving your legs!”  Halleluiah!! I could hear angels singing!

It was around this time my mom took me to wax my eyebrows for the first time.  I was 11 years old and I was constantly being teased about my unibrow.  My mother could not stand it any longer and off my unibrow went! OUCH!  It hurt and I dreaded going every few weeks but this pain was necessary!

And so began my waxing adventure.  It wasn’t before long that eyebrow waxing no longer hurt and I was already waxing them myself.  By the time my Junior year in high school rolled around I was shaving my wolverine arms and started waxing them.

Here’s the thing about waxing.  The first pull always stings… the pain after that is usually numbed by the adrenaline.

In college I tried waxing my legs and underarms.  To me these are not worth it.  First having to let my underarm hair grow out in order to wax it drives me nuts and second it hurts.  Same goes for the legs.  Plus it takes awhile and it gets pretty expensive.  As for waxing those areas… I have no problem applying the wax, but getting myself to make the first pull is almost impossible.  (insert alcohol here... then it's pretty easy!)

It wasn’t until I was 23 when I finally got the nerve to get my first bikini wax.  This is the worst area for me.  On top of having course hair, my skin is super sensitive…

Ok I am not holding back here girls so this might get graphic!

It was probably in college sometime when I started using nair instead of a razor to do my bikini area.  But the red bumps were still there and painful ingrown hairs too.  I was incredibly embarrassed about it.  And let me tell you, I have tried every post shave and ingrown hair treatment known to man and it still didn’t help.

So here I am 23 and a couple girlfriends of mine convinced me that it didn’t hurt nearly as bad as I was imagining.  The first appointment I was just going to do the panty line.  Oh it hurt but my girlfriend’s were right it wasn’t as bad as I thought so I did everything but a narrow strip and my behind.  I had enough waxing trauma for that appointment.

The results were amazing and the next time I went back 4 weeks later the hair was thinner and it didn’t hurt nearly as bad.  Finally after about 6 months of bikini waxing I decided to go completely bare!  I was terrified and thought surely I was out of my mind!  First off waxing your butt area hurts less than an eyebrow wax and going the rest of the way does not hurt so bad either.  You will be hooked after the first time. 

They key to the perfect Brazilian wax is a really good esthetician and your ability to relax.  Many people think it's embarrassing but its like going to a doctor and a good waxer will make you feel comfortable and keep up good conversation.  Once you get through the first visit it is easy to keep going.

Oh and sometimes you have to hold up your legs and hold your skin taught but again, after the initial visit you don't even think twice about it anymore!

 I have talked to many of my girlfriends about it and most of them have agreed that it hurts worse in your mind than the actual pain.  Don’t get me wrong, it’s not pain free I still flinch sometimes, but it is well worth the $50 and the 30 minutes.

Here are my tips and pointers

Do NOT get waxed close to your period… It hurts like 10 times worse than normal!
Take a pain reliever 30 min before your appointment
Wine helps too!
Don’t drink caffeine the day of your appointment
Take deep breaths and try not to tense up
Try to keep up conversation, it will keep your mind off the pulls
There are topical creams that help numb the skin,  I have tried a few and I don’t feel like they help that much.

After the wax use a product to help prevent ingrown hairs EVERY DAY (I keep mine in the shower and apply it right after I shower, or keep it next to your deodorant and put it on the same time you put on deodorant.)

Exfoliate the area with a sugar scrub twice a week.

Go every 4 weeks it hurts a whole lot less and makes maintenance a lot easier as well.

My favorite ingrown hair products are

Your esthetician will be able to determine whether hard wax or strip wax will be best.  The only hard wax that has worked well for me was when I lived in Houston and went to European Wax Center

If you live in Tampa and want the best wax go see Angelica at Angelica Beauty and Waxing she is seriously the BEST and about $10 less expensive than most salons.  I have $15 off referral cards for any of you who want to make an appointment!

For those of you who are thinking about waxing for the first time... start slow and ease your way into it.  the more you do it the less it hurts.  If you try it and it's too painful... you can always stop.

Please feel free to shoot me an email if you have any questions.  I can go into way more detail but I think I have grossed y'all out enough for today!!!

Wednesday, April 13, 2011

Life Writing Photography

Today I want to plug my friend Janie at Life Writing Photography.
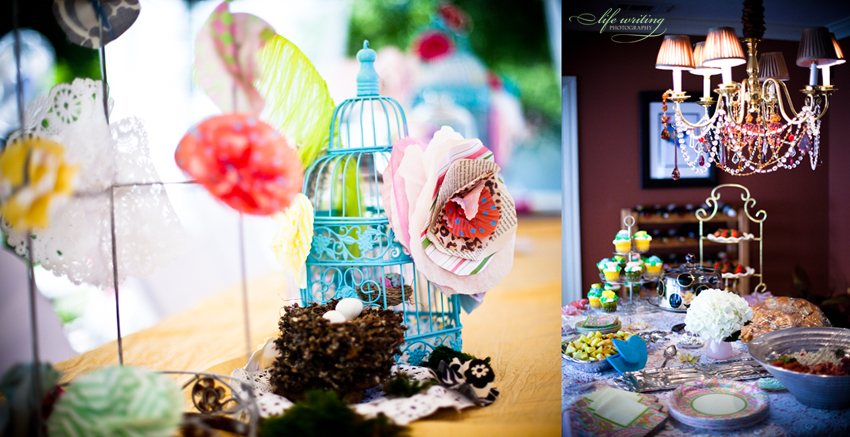
She is such a talented photographer and will also be doing the photography for Stacey's wedding!  It is so great to have photographer friends, so that when they come to your event's they make them look like this!!!! I feel like these pictures really captured the beauty of the day and what a great time we had.

Click HERE to see the pics of the Bridal Shower on her website and there is a great slideshow too!!

Here is a little winged bud vase!

To the left you have a centerpiece and to the right a gorgeous view of the food!

This is a parasol I made in Stacey's wedding colors!

More Centerpieces

Lanterns... So simple yet so chic!


THANK YOU JANIE!

Wednesday, April 6, 2011

Junk Paper Flowers

Another fun flower that I made for the bridal shower were these junk paper flowers.  I used a variety of stuff to pull these off and they looked fantastic.

Here is my list of stuff I used:
White coffee filters
Tea Stained Coffee Filters
Pink dyed coffee filters
Paper doilies
Tulle circles
Book Pages
Scrap paper
tissue paper
cupcake liners


If the paper was stiff I crinkled it up in a ball to loosen it up a little.

Then I stacked the circles in varying order and placed a dot of hot glue in the center of each layer 
I did not glue the top couple of layers until last.
With the base stack i pinched the bottom making a bunch and added glue to the creases to that it would hold.
Then I did the same with the top layers that I did not glue to the main stack and glued it straight to the base stack.

I hope you are following this:)
In the end your rosettes should look something like this.


And here they are in action:)


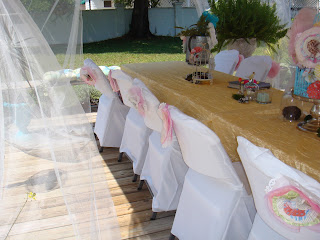
They were pinned to the backs of all the chairs and the guests were welcome to take them home as a little favor!


Cupcake liner flowers

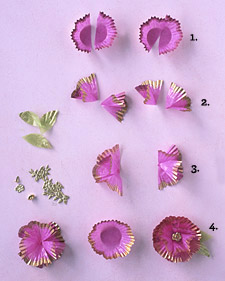
For the bridal shower I just decorated I decided to make a variety of paper and fabric flowers to use in the decor.  One of my favorite styles were the ones I made with cupcake liners.  Since I was using a bunch of flowers I chose the ones that seemed the quickest, and these were definitely easy.

Here are a couple I made.


This is the tutorial I used from Martha Stewart.  They did such a good job I didn't bother making my own!
You can go to the link at Martha's website HERE.
They have a video version of the tutorial as well.

As for the liners,  I got them on Etsy at Hey Yo-Yo
They have the MOST adorable stuff on their!

Hres what some of my cupcake flowers looked like in action!

Monday, April 4, 2011

Nothin like Grocery store flowers!!

I LOVE fragrant lilys.  I buy them from the grocery at a whopping $10.  Now the really fancy shmancy ones from the florist are really great too, but you just cant beat these for the price.  And let me tell you, every once in awhile I get a really spectacular bunch.

This bunch lasted a good 14 days before the first one began to wilt.

I just love to put flowers in my great grandmothers old pitcher:) 


I am guilty of always taking pics at night so i get a little creative with the editing.  Daylight is just so much better!

Stacey's Wedding Shower

Ok here are the pics from Stacey's shower:)  It was lovely and we had a great time... I will post tutorials in the next couple of days.  Enjoy!

These are the centerpieces I had scattered all through the house while I was assembling them.  Birdcages and my mothers old watering can were covered in handmade flowers made out of ...you name it and it's made out of it!  Cupcake liners, scrap paper, doilies, book pages,scrap fabric, coffee filters, etc.


 I decoupaged a bunch of eggs with some scrap paper


Here it all is set up at the party.

we clustered the cages and watering can with cloches, birds nests and cloches.


We put two canopys together and put poms in the tops. 

 Each chair got its own flower and the guest we welcome to take their flower home with them!


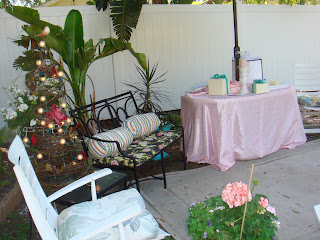
We set up a different seating area under the oak tree to open presents


My mom made this quirky tree out of a tomato cage and grapevine and added lights and butterflies.

 Even the bunny got dressed for the occasion!

Stacey is blessed with great friends .  Her very good friend Janie is her wedding photographer and she took a bunch of fancy pics!!  I can't wait for her to send those to me so I can post them!


Oh lets not forget the food!  Yum!

Party Details:
Linens- Connie Duglin
Decor- Salty Sisters


Signature